


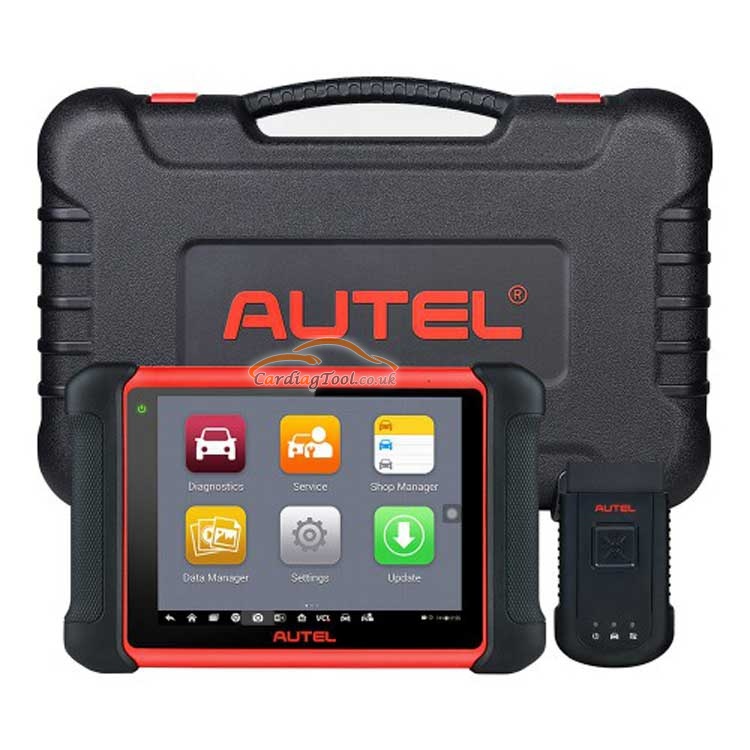
MaxiCOM MK906BT comes out with MaxiVCI V100 Bluetooth Box (this tool can help communicate with vehicles wirelessly), which is combined with the best possible coverage of OE-level diagnostics, and based on the revolutionary multitask-capable Android Operating system. The MaxiCOM organizes information with test instrumentation to help you diagnose symptoms, codes, and customer complaints easily.
This article is gonna help customers tackle with two important usage problems on MK906BT. The first part is software update method and the second one VCI Manager Operations. Check the below content and you’ll learn a lot.
The Update application allows you to download the latest released software. The updates can improve the MaxiCOM applications’ capabilities, typically by adding new
tests, new models, or enhanced applications to the database.
The Display Tablet automatically searches for available updates for all of the MaxiCOM software when it is connected to the internet. Any updates that are found can be downloaded and installed on the device. This section describes installing an update to the MaxiCOM System. A notification message displays if an update is available when the Notifications Center function is enabled in the Settings application.
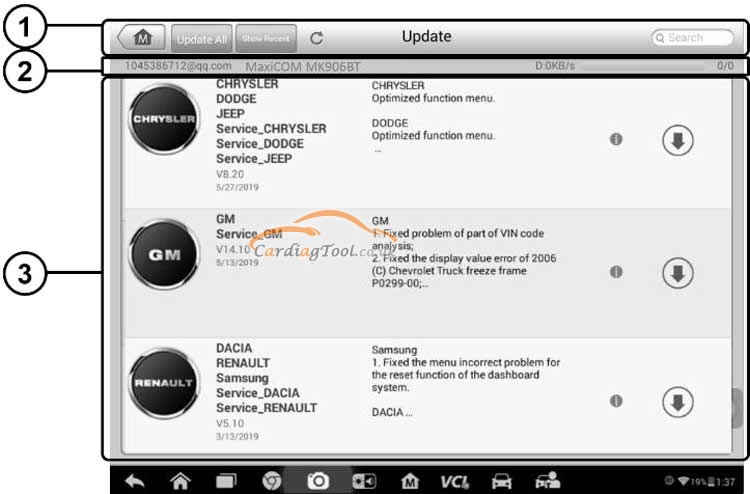
First of all, let’s start with the brief introductions of the unit’s buttons under “Update” screen.
1.Navigation and Controls
(a)Home Button – returns to the MaxiCOM Job Menu.
(b)Update All – updates all available updates.
(c)Diagnostics Tab – displays all available vehicle diagnostic software.
(d)Search Bar – searches specific update item by inputting the file name, for example: a vehicle make.
2.Status Bar
(a)Left Side – displays the MaxiCOM device model information and serial number.
(b)Right Side – displays an update progress bar indicating the completion status.
3.Main Section
(a)Left Column – displays vehicle logos and update software version information.
(b)Middle Column – displays a brief introduction about the new changes to the software operation or capabilities. Tap the corresponding button to open an information screen to view more details, and tap the dim area around to close the window.
(c)Right Column – according to the operation status of each software item, the button displays differently.
But, how can you perform it?
- Tap Update to update the selected item.
- Tap Pause to suspend the updating procedure.
- Tap Continue to go on updating the suspended update.
Here comes the core part — how to update the diagnostic software?
1.Make sure the Display Tablet is connected to a power source with stable access to the internet.
2.Tap the Update application button from the MaxiCOM Job Menu; or tap the update notification message when received one; or tap the Update icon on Vehicle Menu in Diagnostics application. The Update application screen displays.
3.Check all available updates:
- If you decide to update all the items of diagnostic software, select Diagnostics Tab and then tap the Update All button.
- If you only want to update one or some of the item(s), tap the Update button on the right column of the specific item(s).
4.Tap the Pause button to suspend the updating process. When you tap Continue to renew the update, the updating process will resume from the break point.
5.When the updating process is completed, the firmware will be installedautomatically. The previous version will be replaced.
Very well. Next part is the “VCI Manager Operation” that also matters when performing the scanner.
This application allows you to pair up the Display Tablet with the VCI device, check the communication status, and update the VCI software.
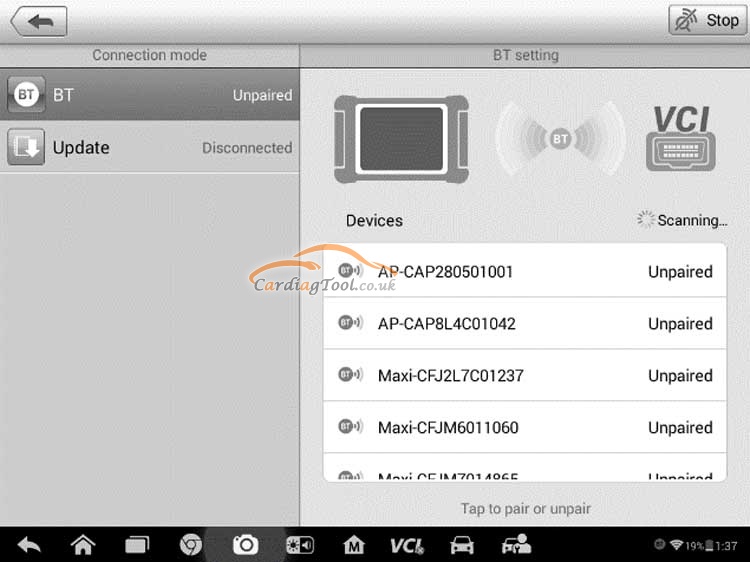
1.Connection Mode – there are three connection modes available for selection. The connection state is displayed alongside.
(a)BT Paring – when paired to a wireless device, the connection state displays as Paired; otherwise it displays as Unpaired.
(b)Update (for VCI software only) – updates VCI software via internet through the MaxiCOM tablet networking using USB connection.
2.BT Setting
The BT Setting screen displays the type and a partial serial number for all of the devices available for pairing. Tap a required device to start pairing. The BT status icon displayed to the left of the device name indicates the received signal strength.
The first operation tip — BT Pairing
The VCI device needs to be connected to a vehicle, so that it is powered up during the synchronization procedure. Make sure the Display Tablet has sufficient battery level or is connected to an AC/DC power supply.
How to pair the VCI device with the Display Tablet?
1.Power on the Display Tablet.
2.Insert the 16-pin vehicle data connector of the MaxiVCI V100 to the vehicle data link connector (DLC).
3.Tap the VCI Manager application on the MaxiCOM Job Menu of the Display Tablet.
4.Select BT from the connection mode list.
5.Tap the Scan button at the top right corner. Now the device starts searching for available pairing units.
6.The device name may display as Maxi suffixed with a serial number. Select the required device for pairing.
7.When paring is successfully done, the connection status displayed to the right of the device name is shown as Paired.
8.Wait a few seconds, and the VCI button on the system Navigation bar at the bottom of the screen shall display a green tick icon, indicating the Display Tablet is connected to the VCI device.
9.Tap the paired device again to unpair it.
10.Tap the Home button on the top left to return to the MaxiCOM Job Menu.
The second operation tip — update the VCI software
Before update the VCI software, please make sure the Display Tablet network connection is stable.
How to update the VCI device software?
1.Power on the Display Tablet.
2.Connect the VCI device to Display Tablet via USB.
3.Tap the VCI Manager application on the MaxiCOM Job Menu of the Display Tablet.
4.Select Update from the connection mode list.
That’s all. Thank you for sharing your time with us!
Don’t forget to contact us at:
Email: sales@CarDiagTool.co.uk
Skype: cardiag.co.uk
Whatsapp: +86 15002705698
Or leave a message at https://www.cardiagtool.co.uk/
to tell us what suggestions or questions you have about our products.