


There is a way to also use the Tech 2 itself as a Card Writer. I’ll explain this method. (It will allow you to write to 12V only Linear Flash Cards if your PC doesn’t have a 12V Cardbus).
Method 1: Using Memory Card Explorer
Method 2: Tech 2 Card Writer
Method 1: Using Memory Card Explorer (MCE)
Anyone that is new to Reading and Writing to PCMCIA Linear Flash Cards will find the topic confusing.
All the basic information you need is not in one place. I personally had to scour the internet and even these forums each step of the way as I hit snag after snag.
Many of the replies to help others on the forums was slightly helpful and the people that replied assumed the person knew things they might not have known.
So I hope this information helps anyone else out there starting out. I may provide links later but for now this will help anyone who has the software or knows where to get it.
Memory Card Explorer Software (MCE) was created by Elan Digital Systems Ltd. Elan went out of business in 2011-2012 and their assets were liquidated. A company named Synchrotech acquired much of what Elan was offering to include MCE.
MCE is no longer supported but can still be purchased. Others have MCE available for download that are unlocked and already licensed so it works without purchase. You will have to search the forums and internet for it.
The latest version of the software is V 3.2.1 and is designed to work with Windows 95/98/ME/NT4/2000/XP.
Most people today would be using Windows XP so that is the only operating system I have used with MCE and this information is based on using XP.
MCE is the program that Reads and Writes the bin files to and from the Linear PCMCIA Flash Card.
Many on the forums expressed frustration getting MCE to work. Having errors after installation. The suggestions by some were to buy a specific laptop to hopefully correct the problem. This isn’t really a solution.
Step 1) Make sure your Laptop or PC has an appropriate PCMCIA Card Bus Slot for your memory card. And make sure your computer has the driver installed for that Card Bus Slot.
Step 2) Install Memory Card Explorer.
Step 3) Insert your PCMCIA Flash Card. XP will show this as a new device. If the driver doesn’t load automatically then go to here for further instructions on how to load a Generic Pcmcia Flash Card Driver. http://www.procat.com/winner/tips/flashread/flashreadxp.html
Step 4) Attempt to run MCE. If your particular PC uses the default memory range then it will open up without error. If you receive an error about the memory range then you need to close MCE. If MCE opened without error proceed to STEP 6. If you received a memory error then proceed to STEP 5.
Step 5) Reboot the PC and repeat Step 3 and 4. If this doesn’t work try Step 5a.
Step 5a) It’s possible that you have a RICOH Card Bus that isn’t working properly. If this is the case then you can also install Memory Card Explorer for RICOH. Located here: http://support.aficio.com/mcericoh/xpv100demo/xp100demo.html
Step 5b) Install Memory Card Explorer for RICOH. When prompted to overwrite existing files click Yes or OK to accept. After installation you can attempt to run it but it shouldn’t be necessary.
Step 5c) Reboot the PC and repeat Step 3 and 4. (you will not use MCE for RICOH. You will be using the regular MCE software).
Screenshot of MCE:
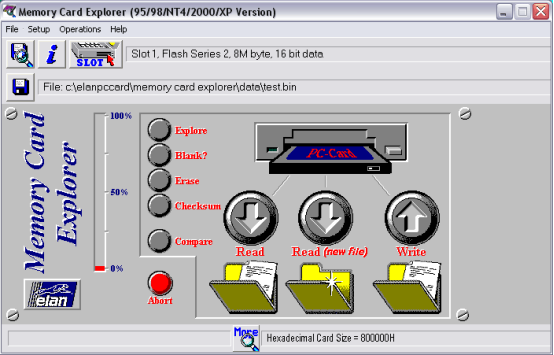
Step 6) Next to the SLOT button it will show which slot MCE is using. If your Memory card isn’t listed here then Click the SLOT Button. Repeat until your Memory card is displayed.
Step 7) Assuming you want to backup your Flash Card before writing to it click Read (new file). This will open up a Save Dialog Window. Make a new bin file name for your current card and click OK. MCE will now copy your current flash card. Wait for it to complete.
Step 8) To write a bin file to the Memory Card first make sure you have the correct BIN file selected. Look at the Button with a picture of a Floppy Disk. To the right of this shows which BIN file MCE will use. To change this file Click the Button. A dialog window will open. Browse to the bin file you want to write and click OK. Make sure this file is on the PC and not over the network.
Step 9) Click Write. Wait for it to complete.
Done!
Some things to NOTE about PCMCIA Flash Cards. Not all Cards even from the same tool are identical.
For instance the OLD Flash Card standards required 12V DC in order to Erase and Write. MCE won’t always tell you this depending on the version of Card. What will happen is it won’t write and it will corrupt your Flash Card making the software not work on it.
Not all PCMCIA Card Bus controllers have 12V-DC. Most of them have 3.3V and 5V which is the new standard. Only specific ones can erase and write at 12V and usually these are very OLD.
The standard changed and almost as soon as 12V was adopted it was abandoned. Because of this companies using the 12V spec cards had to get newer Flash Cards that supported both 5V and 12V Erase and Write. This is why some people can use nearly any Laptop or PC to Write to their cards.
Others who are unfortunate enough to have the older cards that are 12V only will be plagued with issues unless they use the correct Bus or use the Scan Tool itself as the Write Device.
For a limited time you can still acquire Card Bus that supports the 12V spec. But the only source I could find is from Synchrotech. You will have to scour their website and verify specifications that support the 12V DC erase and flash.
The other option is to just replace your Flash Card with a newer model that supports both 5V and 12V Erase and Write.
Method 2: Tech 2 Card Writer
NOTE: This allows you to use the Tech 2 as the Cardbus and will allow you to write to the 12V only Linear Flash Cards.
NOTE: This allows you to also update the Virtual Flash Card on the Tech2Win software using Com Port 9. (You may also be able to copy the bin file into where Tech2Win stores the virtual pcmcia cards. I haven’t tried it yet to verify if it works)
Free download Tech 2 card writer:
https://mega.co.nz/#!hIN0yJKY!IBF60c5uX39JP-K6eSgbGHGlXmzLod9cb4HXkcG1hMw
(The program writes the images to the memory card diagnostic Tech2 device via comport.
No need to remove the card the way the card is written through com port.
I have not tested the efficiency of the program but I think it works.
No password — FREE)
Step 1) Make sure your Tech 2 is connected to the PC via the Serial Connection and is in a Download Ready State. (instructions can be found in Tech 2 manuals or the forum or Google)
Step 2) Run the Card_write.exe program (Tech 2 Card Writer)
Step 3) Select the COM Port number your Tech 2 is connected to. (Tech2Win defaults to COM Port 9 but you should verify)
Step 4) Click Start
Step 5) A window pops up. Browse to the BIN file you wish to upload then click OPEN.
Step 6) Do Not Disturb during the update process. If it is working you will see activity on the Tech 2 as well as a progress bar on the Tech 2 Card Writer Software.
If you receive an error it’s most likely that your COM connection isn’t working. It will usually throw and error stating that the connection is Open. This means it’s not talking with the Tech 2 and you have a connection issue.
That’s it. Once it’s finished, the Tech 2 scan tool will reboot and the new software should be usable.
I hope this information is helpful and feel free to comment if you have something to add or have any questions.
Good luck!
(BIG THANKS to the contributor for his writing above)