


- Disclaimer:
This document contains technical information that could potentially lead to damage of personal property. The author provides no warranties, guarantees of success, nor shall be held liable for any damages (personal, property, mental, financial, etc) incurred to anyone who uses this document.
This document is designed to be as an instructional guideline purely for educational purposes and it should be treated as such! You are welcome to experiment and attempt to improve the techniques discussed in this document, but there are no guarantees of success. Be warned: Your Mileage May Vary!
All critical warnings are highlighted in red.
All informational notes are highlighted in gray!
It is imperative that you follow all the steps in the order presented in this DIY document.
- Tools needed:
* A laptop running Windows 32-bit. Windows XP and Windows 7-32-bit are acceptable!
Note: Some have managed to create a VMWare virtual machine which contains all the tools necessary for this to work on other operating systems. You may or may not succeed in doing so because it depends on the driver software used by your DCAN compatible USB dongle. I tried creating a complete VMWare virtual machine, but the USB cable drivers caused it to crash. YMMV!
Note: Some have managed to get this running under 64-bit Windows by installing XP-Mode from Microsoft. Please, be warned that the EDIABAS software contains certain 32-bit and even 16-bit tools which are not guaranteed to run under 64-bit Windows! There is a much higher chance of software crashes and failures!
* K-CAN compatible USB cable. There are several vendors on various online web sites. I am using a “cheap” Chinese cable from www.cardiagtool.co.uk (price €17 with a switch) and it works fine. It is hard to recommend a specific cable, so dig online and find one that fits your budget!
Here Inpa K-can cable mux and PCB:

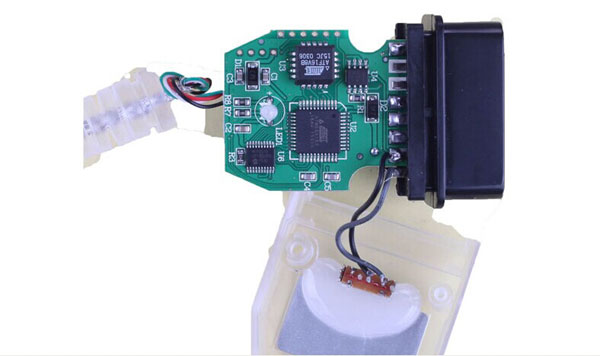
Note: as you can see it includes a CD with the drivers for their cable
Procedure:
Step 1: Download the zip: http://199.192.200.202/N54-Injector-Coding.zip
Step 2: Follow the below instruction.
- Driver Installation:
Plug in the K+CAN cable into your USB port. Install the driver software (if an installer is provided). If an installer is not provided, you might have to point Windows Device Manager to the location of where your drivers are.
With the cable still plugged into your USB port (not connected to car), launch Windows Device manager. Find the Ports (COM & LPT) section as illustrated below:
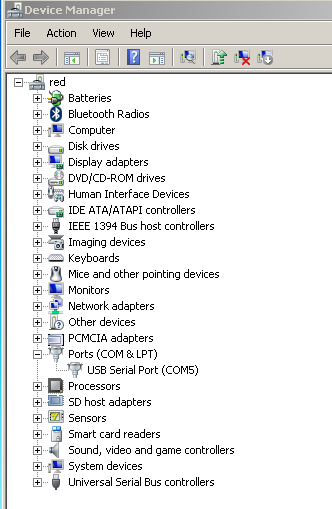
As you can see the picture above shows that the Windows has assigned COM Port 5 to the D-CAN USB cable.
Make note of the COM port number that you have assigned for your K+CAN cable. It is extremely important in the next steps!
* Right Click → Properties on the USB Serial Port. Go to Port Settings tab and press the Advanced button:
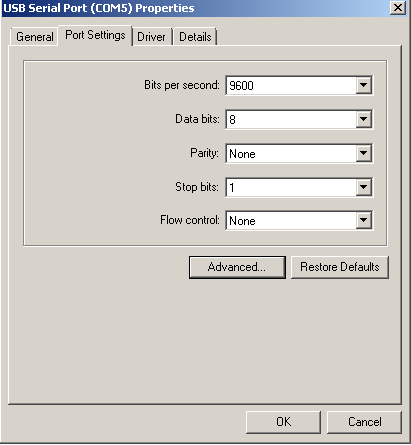
* Make it look like this (except for the Com Port number):
* Press OK and close all other windows with the OK button.
- Setting up INPA:
* Extract the contents of the N54-Injector-Coding.zip file to the C:\ drive!
* Create a shortcut from C:\INPA\BIN\INPALOAD.EXE to your Desktop
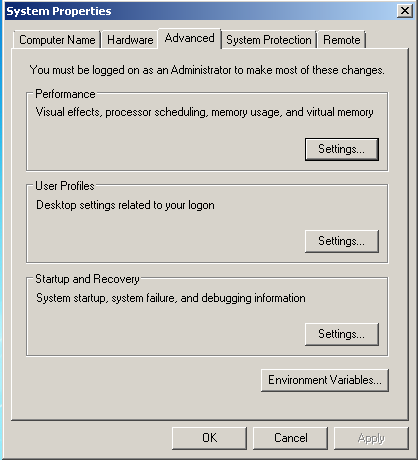
* Go to System Properties. Under the Advanced tab, click the Environment Variables button:
* Edit the Path Variable and make sure you append (add to the end) the following: C:\EDIABAS\BIN
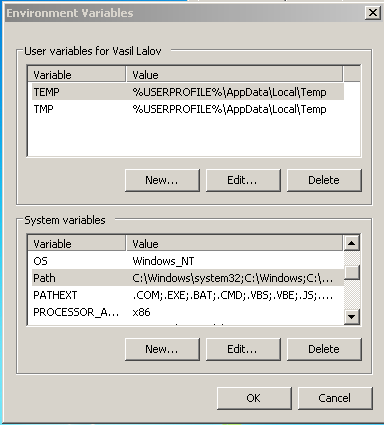
* Add a new system variable by pressing the New… button. For Variable type in: ediabas_config_dir . For Value type in:C:\EDIABAS\BIN as shown below:

* Press OK to make those changes take effect. If Windows wants to restart, do it!
* Go to C:\EDIABAS\BIN folder. Open OBD.ini file in a text editor. The first 4 lines should look like this:
[OBD]
Port=Com5
Hardware=OBD
RETRY=ON
Make sure that the port number matches the one you set during the D-CAN USB driver installation! If the COM port numbers do not match, EDIABAS will not be able to talk to your car!
Once you verified that this is the correct port number the D-CAN USB driver is using, save the file in it’s current location.
* Copy C:\EDIABAS\BIN\OBD.ini file to C:\Windows folder!
Warning: The same OBD.ini file must be in both locations: C:\EDIABAS\BIN and C:\Windows. If you change the contents of one of the locations, make sure you copy the file to the other location as well!
* Restart your computer! This is very important!
- Coding the Injectors:
The entire process took me anywhere from 30-1hr, the more you are skilled the less time you will spend.
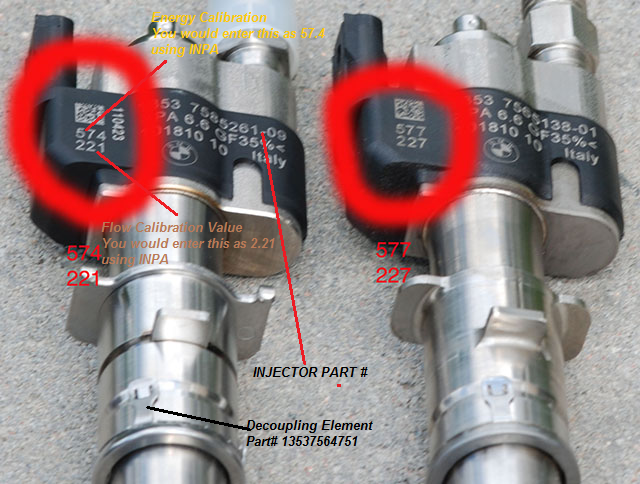
First thing I grabbed a notebook and I wrote down the new Injector numbers and also the old ones as well in case I needed them later.
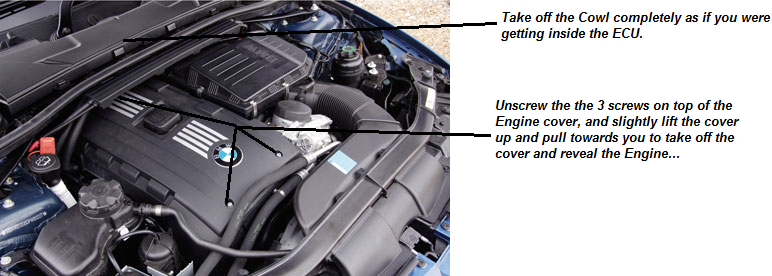
Ok, now take off the cowl completely and take the engine cover off…
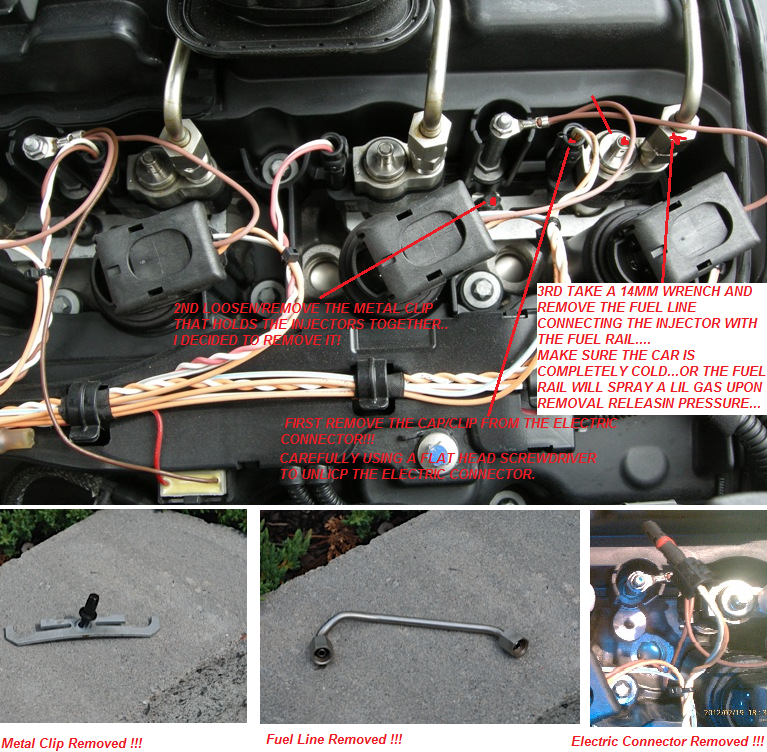
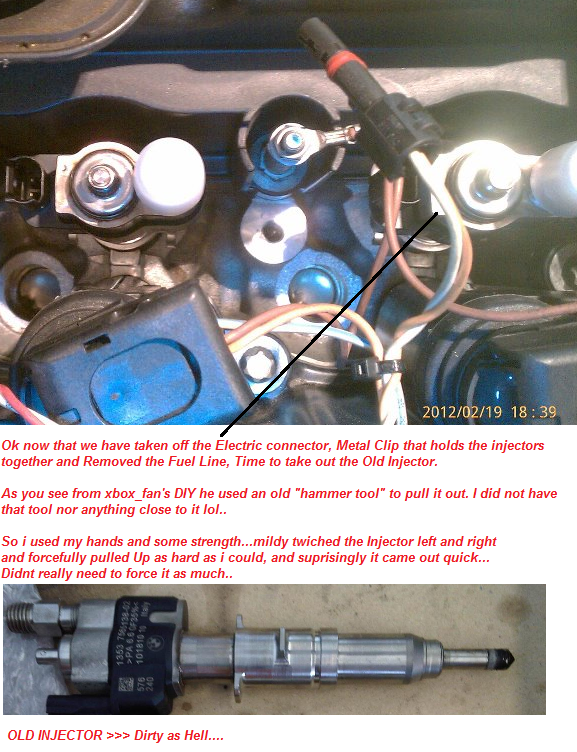
Ok now that the cover is off and we can see our injectors, time to get durrty! lol first i decided to take out the Electric connector then slowly loosen up and remove the metal clip that holds injectors together in my case was 1&2, then slowly removed the fuel line, my car was a bit hot since this was like after i only let my car sit for an hour before i decided to do this, so when i loosened up the fuel rail a bit of fuel sprayed but i quickly put a soft cloth on top of it so it doesnt spray on top of my engine, at first i was scared, but only a bit of fuel sprayed and it just evaporated after anyway…just make sure you have something to quickly cover the fuel line from spraying all over.
Ok, now we’re ready to Remove the Injector as i stated in the pic below, mildly moved the injector left and right and forcefully just pulled up and it came out pretty quick without using any tools.
Now that the Injector is OUT, time to get our New Injector and put that Baby IN it’s home and let it do her thing lol’.
Simply slide up the Decoupling Element as you seen how it was on the Old Injector when you took out, And take off the CAP from the new Injector so we can install it.
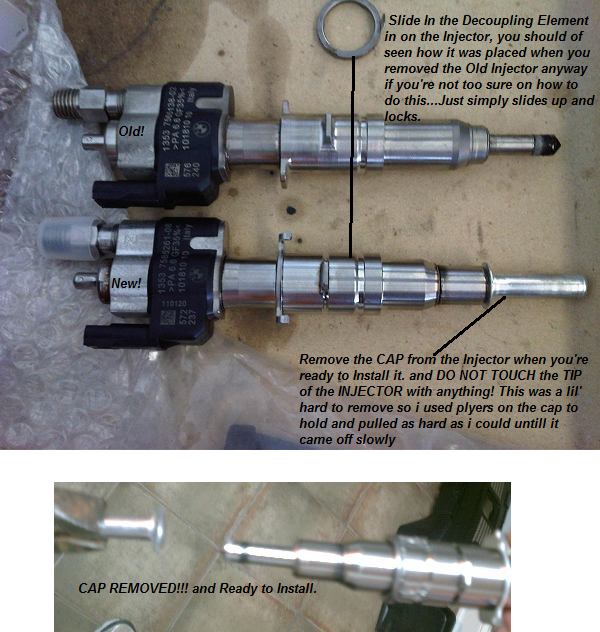
Now put the New Injector In and Push mildly until its sitting flush, see pic below! You can mildly also hit it with the bottom of a screw driver until it’s sitting good.
Now that we installed that time to put everything back in reverse and tighten up good, before you put the cover on..Double check you’re work! and put the cover on and you’re done Installing them.
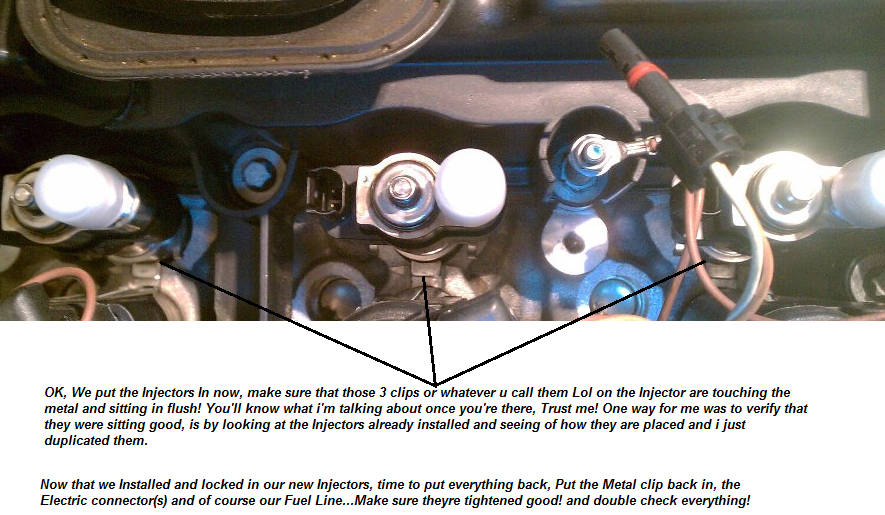
INJECTORS INSTALLED AND ELECTRIC CONNECTOR/FUEL LINE/METAL CLIP ALL IN!
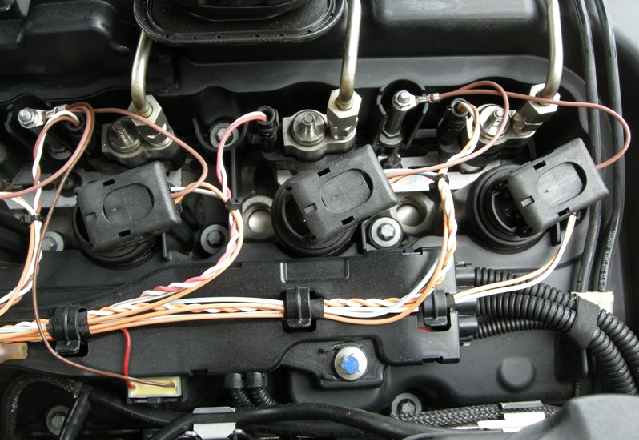
PUT THE ENGINE COVER ON AND TAKE OUT UR PC; READY TO CODE THEM!
Done!
- Additional Info:
* The N54-Injector-Coding.zip file includes the latest data (DATEN) files for the E90 only! The version is v45 data files. Even though there are many other options in the INPA main menu, please be advised that the data files must be updated in order for INPA to work with the other cars.
* If you have a piggyback tune you must set it to full bypass mode. All CAN hi-jacking must be disabled or removed!
* NCSExpert provided here has been tested working for E90 ONLY! Do not try to use NCSExpert with other cars unless you have updated the daten files. Head over to bmwcoding.com and start reading more about how to code with NCSExpert.
* There is an INPA_FAQ.pdf provided in the zip file. It contains common errors with INPA and some help on how to resolve them.
This is a good starting point if you are seeing error messages on the screen.
* The NCS_DIY.pdf file is also included in the zip file. Use it with caution! You can skip to step 18 on it as you’ve already setup INPA correctly.
* I am currently working on translating the MSD80 INPA file. When I finish translating it, I will provide instructions on how to use it.
Check the forum link below for more info.