


Post is on VXDIAG VCX NANO for Jaguar Land Rover setup instruction, tips, update and FAQ, all info here, please go on for checking.
Part 1: VXDIAG Nano for Jaguar Land rover Frequently-asked-questions
Q: which better among VXDIAG VCX NANO for Jaguar LandRover, JLR Mangoose SDD (Item No.SP116,SP205) and VCM2
A:
1) Have same software and perform same function.
2) Differ in hardware and use different drivers
3) VXDIAG VCX NANO nice feature is the firmware will never be locked (unlike VCM2 SDD for JLR).
Q: I have followed the installation instructions but SDD will not start, any ideas?? Installed on Win 7 Pro 32bit, have the vx manager driver installed, no error reports and no error screenshots. Install was OK, everything works right up to opening sdd, then nothing?
A: Your VXDIAG VCX NANO interface is not plugged into vehicle’s diagnostic socket before you run the SDD software.
A: Does the VXDIAG SDD for JLR support diesel models?
Q: Yes, it supports both diesel and petrol models.
Q: Will the new VXDIAG SDD support both online and offline programming? Need I pay extra payment?
A: The new SDD will do reprogramming (Immobilizer programming online requires Jaguar account. Other programming does no need to do online, but you need connect storage battery to make sure your voltage is stable)
Q: What year does the new SDD cover? Will it do Jaguar 2015?
A: The SDD supports 2005 to 2014 Jaguar and Land rover models.
Q: I have watched and installed as per vide, this allows offline mode to work for one day then it does not work?
A: For all the JLR software after V137, they can’t support offline programming anymore, only online programming.
Q: Does it support Dutch language?
A: Yes, the VXDIAG SDD supports multi language, includingEnglish/Japanese/Portuguese/Romanian/Korean/Dutch/Polish/Turkish/Spanish/French/Italian/Croatian/Danish/German/Swedish/Finnish/Slovenian/Czech/Russian/Greek/Chinese.
Q: When it active rear camera and headlight on 2012 range rover evoque, I want to modify the CCF file, can Vxdiag for JLR perform?
A: Yes, you can have a try.
Part 2: VXDIAG Nano Installation tips, connection, JLR SDD driver and License
Step 1: VXManager Installation
Before start to diagnose vehicle, you have to install VX Manager and driver which are stored in the CD-ROM, or you can browse http://www.vxdiag.net to download the newest setup files.
Computer Requirements
Processor: Pentium 4/1.6GHz+.
Memory: 2G Bytes or more.
Hard disk: 40G or more.
Display: Resolution 1024×768 or higher.
Network interfaces: LAN 10/100M or 802.11b/g.
Communication Interface: USB2.0 or USB3.0
Operating System:Windows XP/Vista/Win7/Win8/Win8.1
- Run VX Manager.exe to setup
- Click [Next]
- Select [I accept the agreement],then click [Next]
- During installation, disconnect USB cable to the PC, then click [Next]
- Software Installing……
- VXDIAG SDK Driver installing……
- Setup complete.click [Finish]
Setup complete. The shortcut will create on the desktop

Connection device and run VX Manager, The information of device will be displayed in “Device Manager”.

Step 2: VXDIAG Connection
Hardware Connection is two connection mode availabe:
- USB Connection
- WiFi Connection
VXDIAG USB Connection
Connect OBDII cable to the vehicle 16pin diagnostic port, and USB cable to the computer.

After device boot complete, the power led will flash, and the buzzer will prompt.
- Install USB driver for Windows 7/8/8.1/10
The first time to connect USB cable to the computer, Windows will prompt [Installing device driver] . Windows automatically complete driver installation.
- Install USB Driver for Windows xp
The first time to connect USB cable to the computer, Windows will prompt [Found New Hardware]
Please follow these steps to complete USB driver installation.
- Select [No, not this time], then click [Next]
- Select [Install Driver Automatically], then click [Next]
- Please wait while the wizard installs the software
- Complete Found New Hardware Wizard, click [Finish]
- Thereafter, it will pop up the second time [Found New Hardware Wizard], same as above.
- The USB Driver installed completed.
After USB driver is successfully installed, PC LED will flashing.
Please make sure the device is connected.
Run VX Manager, The information of device will be displayed in “Device Manager”.
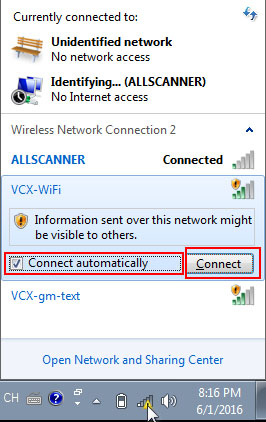
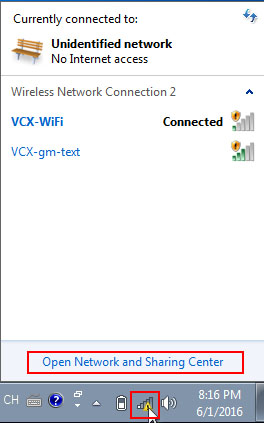
VXDIAG WiFi Connection
Connect OBDII cable to the vehicle 16pin diagnostic port, and computer connect to the device through WiFi.
- Click VCX-WiFi, and check [Connect automatically] ,then click [Connect]
2.Setting obtain an IP address automatically
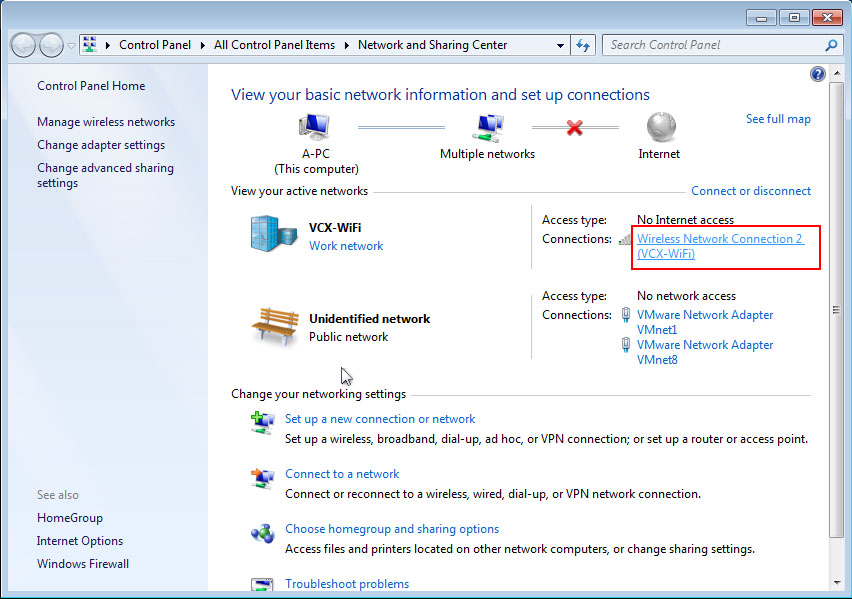
Then select “Properties” – “Internet Protocol Version 4(TCP/IPv4) “, then “Obtain and IP address automatically” and “Obtain DNS server address automatically”
3.Start VX Manager program,select [Device],then click [Configure], Connection Type select [WLAN],click [Save]
4.Restart VX Manager program,computer have been connected to the device through WiFi
Watch video on VXDIAG WiFi Connection: http://www.vxdiag.net/wiki/en/index.html#!pages/VXManager/vxdiag_connect.md
Step 3: Install JLR SDD driver
Please make sure the License has been purchased and updated
Please make sure the device is connected. Run VX Manager.
Please make sure the network is connected or error.
1.VX Manager can manage multiple original diagnosis functions.
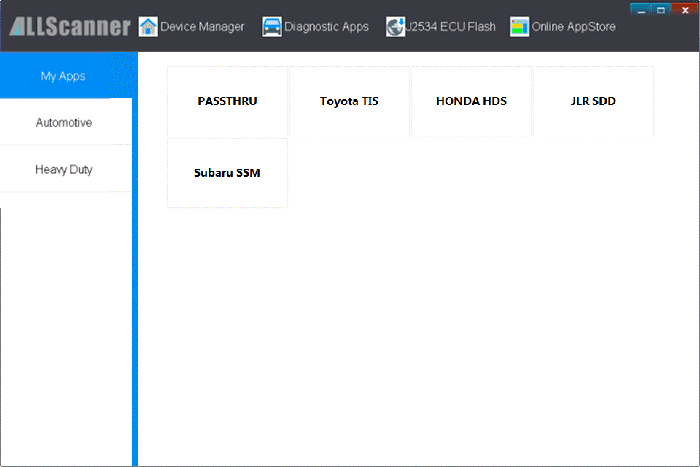
2.To use the original factory diagnosis functions, you will need to buy corresponding License and install corresponding vehicle diagnosis driver. For example Installation JLR SDD driver.
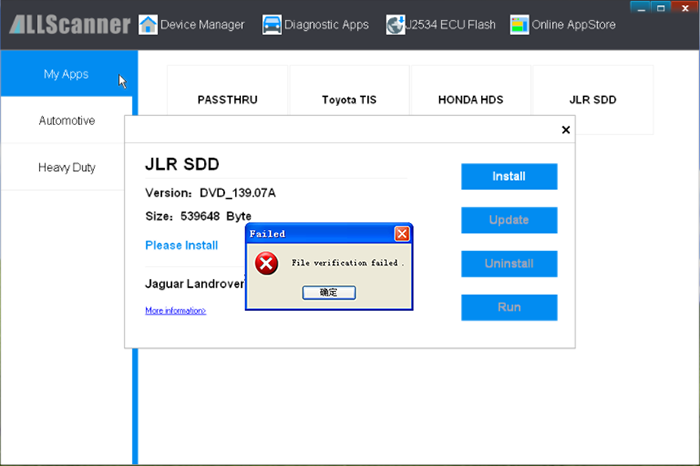
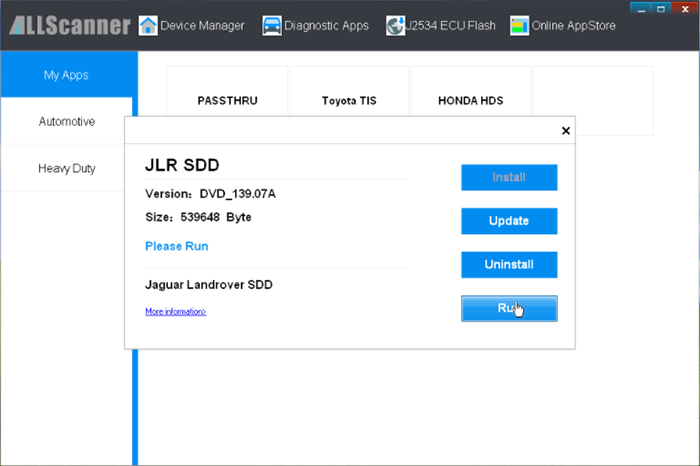
Click [Diagnostic Apps] -> [My Apps], then click [JLR SDD] and you will get
a driver installation window.
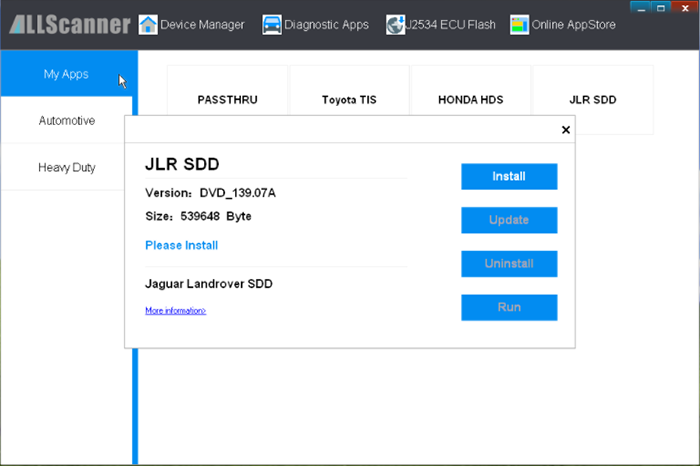
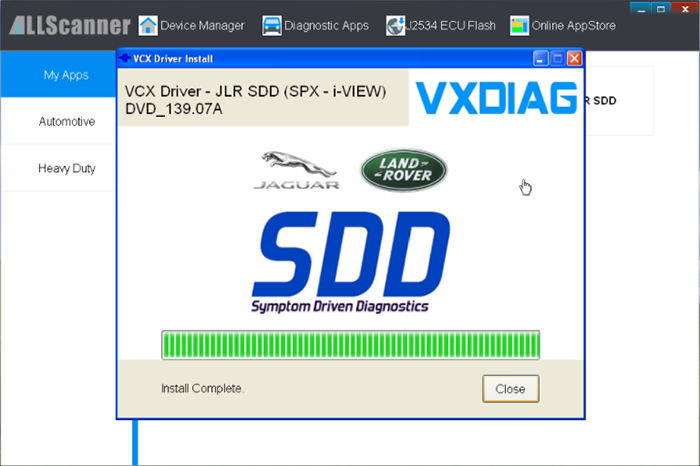
3.Click [Install],VX Manager will download the newest diagnostic driver from server and install, then you can start to use the original diagnosis function. The installation UI is below:
Update OEM driver (For example Update JLR SDD):
- Click [Diagnostic Apps] -> [My Apps], then click [JLR SDD] and you will get a driver Update window. Click [Update]
- VX Manager will download the newest diagnostic driver from server and install

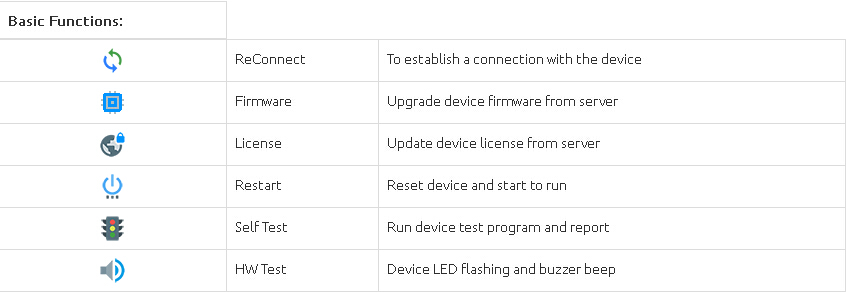
Step 4: VXDIAG Firmware Upgrade
- Connection VXDIAG to PC
- Start [VX Manager]
- Click [Device Manager]
- Click [Information]
- Click [Firmware]
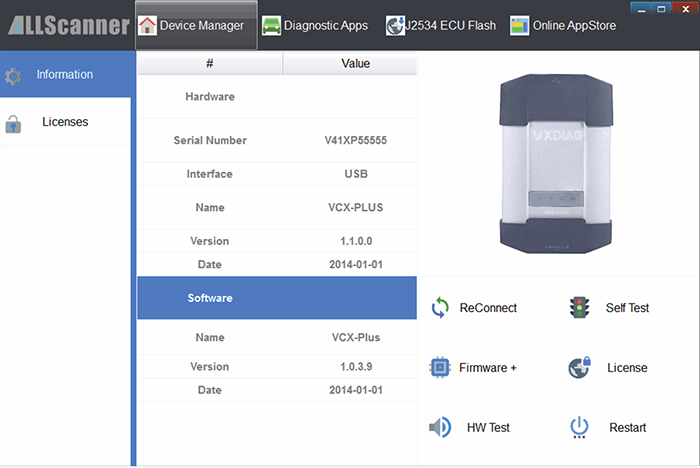
- Click [Upgrade] to Upgrade Firmware.
During Upgrade, do not disconnect VXDIAG connected PC